ETUDE HOUSE Fresh Cherry Tint Lip Stain Review with Pics!!


ETUDE HOUSE FRESH CHERRY TINT LIP STAIN!!


I just tried it today and I love the feel of it, the texture is very different from the lip stain that i've tried so far from Covergirl & E.L.F in U.S. I didn't really like the texture of the lipstain from Covergirl & ELF because after application, it made my lips either dry or sticky. 

The Etude lip stain was a pleasant surprise because it has a nice cool and tingly feeling when apply on your lips, and after it dried, your lips doesn't feel sticky at all like lipgloss, you can apply chap stick and the color won't even come off for me. The color also stays on pretty well, I only had to reapply it once today as compare to several times after I eat with the other lip stain. 

(Me in my car this morning before the lip stain under natural light)

(applying the lip stain, the substance feels cool and watery)

After the lip stain ^_^


when first apply it doesn't seem as dark but after it dries, you can see the pink quite well and it looks natural. *I always wondered how all the korean celebs have natural looking pretty pink lips all the time, I guess this was their secret*


Sample given by seller ^_^, one of the reason why I love ordering from Korea 'cause they always give cute lil samples that I can try out before I actually buy the full size product.


It contains 5ml Aloe Moistfull soothing lotion & 5ml soothing skin moisturizer liquid. The label says:

"Moisturizing soothing skin care line containing enriched Baobab tree extracts & organic aloe, supplies instant moisture to the skin with soothing care. 

Note: This post was not endorsed by the seller, it just contains my honest review because I just start to love this product! & wanted to share with all you ladies *(=^_^=)* 

Bought for $6.5 on Ebay under seller 2010bigbang from Seoul, Korea

PINK GLITTER textured Hawaiian Aloha FLOWERS NAILS pink Tips DIY

REMEMBER TO ALWAYS APPLY BASE COAT 1ST.

Apply base coat
~ get a small sponge and apply polish on it, press the sponge on the tips of your nails to create textured pink color on the tip of your nails

Apply as many coat as you prefer with the sponge until you think it's pink enough. 
~ Now use the other side of the sponge and apply glitter polish on the edges
~ Do the same as with the pink polish, and making sure the pink polish is dry, then lightly apply the glitter with the sponge
MAKE 5 DOTS WITH WHITE POLISH, then USE TOOTHPICKS TO SPREAD OUT THE ENDS and middle to create a Hawaiian inspired flower.

Apply a nice clear gemstone in the middle of the flower to be the pollen. 


Then apply topcoat to keep everything in place. 


RETRO Large Asian eyes Doll-like MAKEUP DIY BLUE SHADOW


APPLY PRIMER, then foundation

Comparison with and without foundation


Apply concealer if needed.

major areas are:

On your forehead, and around the areas of your mouth, or over any redness and uneven spots.

Also under your eyes to cover, dark patches.

don't forget the pores on your nose. 

set everything with powder.

EYES:!!

APPLY LIQUID LINER, extending a little past your eyes.


Sweep gold shadow across your tear ducts.


You can contour your nose with a darker powder.


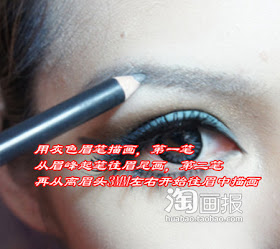
Line your brows.


CONTOUR: * THE IDEAL SHAPE according to cosmeticians is an oval face*


FINALLY YOUR LIPS:


BLACK & RED Sparkle Star Night Jewel nails DIY


SUPPLIES:

Base coat, red polish, black polish, silver sparkle polish, & top coat


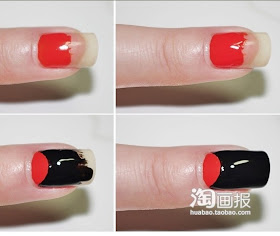
Paint 2 coat of red polish & stop around the middle of your nails. Then the difficult part is to shape the black polish as a half moon to the rest of your nails as shown (2 coats) 

Adorn with small rhinestones along the half moon of your nails. 

ADD THE JEWELS 1ST, THEN APPLY A COAT OF GLITTER POLISH.


Complete with 1 layer of top coat.